To order:
The Unspoken Narrative, a composer's handbook
© 2020 Grumpy Monkey Music
THE UNSPOKEN NARRATIVE (sample chapter)
a composer's handbook
RECORDING & PRODUCTION
chapter EIGHT
Key Thoughts
In this chapter we will focus on:
LEARNING NOTES:
In this chapter we will focus on:
- The studio…
- Microphone Technique
- The edit and the mix
LEARNING NOTES:
- Each of these techniques should be followed with a recording session to properly comprehend the methodology.
- Chapter Take Aways are included at the end of the chapter for thought and discussion.
- A grading rubric is available upon request.
THE STUDIO
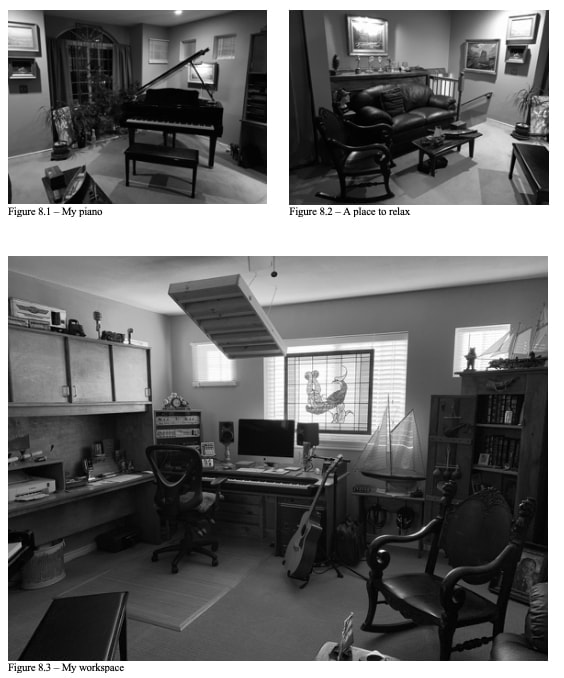
When I set out to build my personal studio I had certain parameters in mind. It needed to feel like my living room (without actually being in my living room). Because I am a composer, I often record strings and solo instruments in the middle of the room, so I wanted the acoustics to have a semi-live feel without sounding too dead acoustically. The space needed to be big enough for my concert grand piano. I love natural light, and the design required many windows. Lastly, the workstation had to wrap around me for smooth, uninterrupted workflow. I built an addition over our garage to house the studio. The floors and walls are incredibly thick to help subdue sympathetic vibrations in the structure. The desk was custom built to hold my keyboard in a way that felt natural to me as a piano player. Everyone has different expectations, and each studio should reflect the artist. Like most studios, mine has evolved over time, but three basic elements have always remained the same; a workspace, a place to relax, and my piano.
As a composer, I do not need separate rooms for isolation. I record all of my instruments at my workstation. The room was designed so that the sweet spot for recording is right in front of my controller keyboard. The diffuser, hanging above the chair, helps break up the sound and keep some of the acoustic reflections at a minimum. Environment has a huge effect on my creative process. Aesthetics are very important to me, and I take great strides to be sure that my creative space feels natural and inspiring. - SEE FIGURES 8.1 - 8.3
MICROPHONES
Microphones have not changed much over time. The same basic construction elements found in modern mics are fundamentally the same as mics from the last century. The signal path is quieter in newer mics, but the most sought-after mics are vintage relics that still cause engineers to take out second mortgages in order to fill their mic lockers.
There are basically three different types of microphones; condensers, ribbons, and dynamics (explained later in this chapter). All three variations have differing polar patterns; cardioid, omnidirectional, and figure eight. Let’s look at these in detail, starting with polar patterns.
POLAR PATTERNS
Before we talk about the difference between microphones and how their construction affects recording, it is important to understand polar patterns. Polar patterns influence the way a microphone hears the sound. Each pattern hears sound differently. Higher end condenser microphones will usually offer the engineer a choice of polar patterns that are switchable from the mic or the power source.
CARDIOID: The cardioid pattern captures the sound in a very tight pattern right in front of the mic. The term cardioid (or epicycloid), was originally named by Giovanni Francesco Mauro Melchiorre Salvemini di Castiglione, an Italian mathematician and astronomer in 1741, for its heart-like form. Most of the microphones used for live vocals on a stage have a set cardioid pattern. The benefit of this pattern is strong back rejection, meaning that noise behind the mic is automatically cancelled out. This is beneficial on a stage with monitors where feedback is an issue. It is also helpful when a tightly focused recording is needed. In almost every vocal recording, some type of cardioid pattern is generally utilized. This is also a great choice for close-miking instruments on the stage and in the studio. - SEE FIGURE 8.4
OMNI: A perfect sphere around the mic allowing for 360 degrees of input. The omni pattern adds very little to the sound and is considered the purest of the three patterns. Using this pattern gives the recording a very open and natural sound. I often use this pattern when recording piano, and instruments where capturing the sound of the room is important. - SEE FIGURE 8.5
FIGURE EIGHT: A figure eight pattern (or bidirectional) picks up sound equally from the front and back of the mic. The pattern rejects sound coming from the sides. Most ribbon mics are figure eight. This is a great way to record brass and intimate instruments such as small flutes and hand percussion. I also use this pattern to record choirs and large ensembles. - SEE FIGURE 8.6

THREE TYPES OF MICROPHONES
Microphones come in all shapes and sizes, but they are broken down into three fundamental categories; dynamic, condenser, and ribbon.
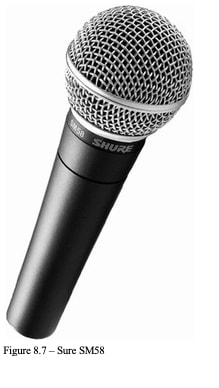
DYNAMIC MICS: The dynamic mic functions via electromagnetic induction (coiled wire). Think of them as a speaker, only in reverse. This type of mic is often used for live stage performance. Most handheld vocal mics are dynamic with cardioid patterns. A coil is placed within a magnetic field and attached to a diaphragm. A diaphragm could best be described as the piece of wax paper that vibrates in a kazoo. As sound moves over the diaphragm it causes the membrane to vibrate. This causes the coil to move in the magnetic field, producing a current through electromagnetic induction. The Sure SM58 is one of the most popular dynamic mics ever made. Dynamic mics are also called moving-coil microphones and they are generally very rugged and durable. - SEE FIGURE 8.7
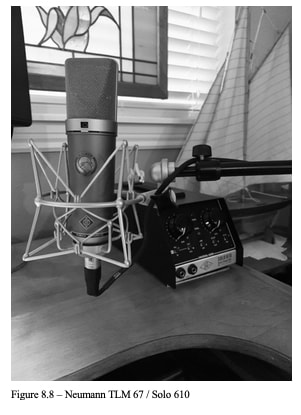
CONDENSER MICS: The condenser mic, also known as the electrostatic mic or a capacitor mic, was invented at Bell Labs in 1916. The mic uses a round diaphragm to capture vibrations created by sound, and requires phantom power. This means that DC (direct current) is needed to drive the circuitry. Condensers range from telephone transmitters to studio mics. They generally produce a high-quality audio signal and are the popular choice of recording studios. Upper end condensers usually give the engineer a choice of switchable polar patters, making them incredibly flexible in the studio.
One of my favorite mics is the Neumann TLM 67. Originally developed in 1960, this has been a go-to mic for many recording engineers. Condensers are a great studio choice because they work well recording practically anything. - SEE FIGURE 8.8
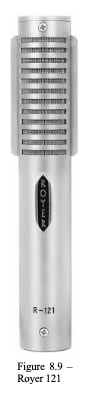
RIBBON MICS: Ribbons have a warm colored sound and are best used in the studio, and not for live stage performances. Brass instruments generally sound wonderful with ribbons. Ribbon mics utilize a thin metal ribbon hanging in a magnetic field. The ribbon is connected to the mic’s output, and its vibration within the magnetic field generates the electric signal. Most ribbon mics use a figure eight polar pattern. They are very sensitive and need to be used carefully. These mics do not usually require phantom power, and running power to them can ruin the ribbon element. Some newer ribbons use a pre-amp and will need phantom power. One of the recent innovations in ribbon technology is the Royer 121. This is one of the few robust ribbon mics. The 121 has become a staple in many studios for its use as an electric guitar mic. - SEE FIGURE 8.9
Microphones come in all shapes and sizes, but they are broken down into three fundamental categories; dynamic, condenser, and ribbon.
DYNAMIC MICS: The dynamic mic functions via electromagnetic induction (coiled wire). Think of them as a speaker, only in reverse. This type of mic is often used for live stage performance. Most handheld vocal mics are dynamic with cardioid patterns. A coil is placed within a magnetic field and attached to a diaphragm. A diaphragm could best be described as the piece of wax paper that vibrates in a kazoo. As sound moves over the diaphragm it causes the membrane to vibrate. This causes the coil to move in the magnetic field, producing a current through electromagnetic induction. The Sure SM58 is one of the most popular dynamic mics ever made. Dynamic mics are also called moving-coil microphones and they are generally very rugged and durable. - SEE FIGURE 8.7
CONDENSER MICS: The condenser mic, also known as the electrostatic mic or a capacitor mic, was invented at Bell Labs in 1916. The mic uses a round diaphragm to capture vibrations created by sound, and requires phantom power. This means that DC (direct current) is needed to drive the circuitry. Condensers range from telephone transmitters to studio mics. They generally produce a high-quality audio signal and are the popular choice of recording studios. Upper end condensers usually give the engineer a choice of switchable polar patters, making them incredibly flexible in the studio.
One of my favorite mics is the Neumann TLM 67. Originally developed in 1960, this has been a go-to mic for many recording engineers. Condensers are a great studio choice because they work well recording practically anything. - SEE FIGURE 8.8
RIBBON MICS: Ribbons have a warm colored sound and are best used in the studio, and not for live stage performances. Brass instruments generally sound wonderful with ribbons. Ribbon mics utilize a thin metal ribbon hanging in a magnetic field. The ribbon is connected to the mic’s output, and its vibration within the magnetic field generates the electric signal. Most ribbon mics use a figure eight polar pattern. They are very sensitive and need to be used carefully. These mics do not usually require phantom power, and running power to them can ruin the ribbon element. Some newer ribbons use a pre-amp and will need phantom power. One of the recent innovations in ribbon technology is the Royer 121. This is one of the few robust ribbon mics. The 121 has become a staple in many studios for its use as an electric guitar mic. - SEE FIGURE 8.9
PRE-AMPS
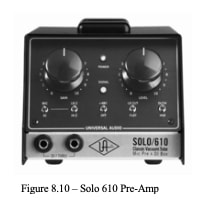
A pre-amp is an electronic amplifier that enhances a low electrical signal for amplification. It is used to increase the volume of the mic or instrument without damaging the original sound. Microphones, and most electric instrument signals, are generally too weak to be transmitted for recording and mixing. Pre-amps increase the strength of the signal. - SEE FIGURE 8.10
The pre-amp is what gives the microphone its power. Every mic needs some sort of pre-amp. Pairing a microphone with the appropriate mic pre-amp is similar to choosing the right wine with dinner. All pre-amps will do the job, but proper selection is critical for the best overall sound. My go-to mic/amp combination is the Neumann TLM 67 with a Universal Audio Solo 610. I love the modern quiet circuitry with the vintage characteristics.
The following is an example of basic signal flow: (how you plug them in…)
MIC/INTRUMENT > PRE-AMP > MIXING BOARD > SPEAKERS
MIC TECHNIQUES
Understanding proper mic choice and placement is of the utmost importance for recording. The right mic, placed wrong, will not achieve the desired sound. I remember my first mentor, Len Silberg of Producers Two, teaching me how to painstakingly place a mic in front of a vocalist. The difference between a few inches and a slight angle can make or break a recording. Miking techniques vary widely, and this text is not meant to be an exhaustive study on the subject. The examples shown in this book are generally seen as some of the basic standards adapted in many studios.
FIVE BASIC STEPS FOR A GREAT RECORDING:
VOCALS:
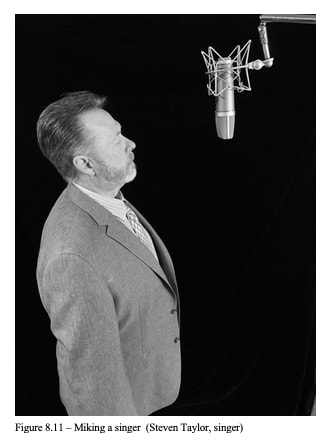
There are basically two types of vocal recordings; sung and spoken. They each utilize different mic techniques in order to capture the performance. In the studio, a large diaphragm condenser mic set to a cardioid polar pattern is commonly used for voice. Axis describes the angle of the mic as it is pointed at the person or object to be recorded. I will rarely point a microphone directly at the mouth of the vocalist. There are times when a slight angle is advantageous to avoid plosives (pops) such as in the letter “P”, and unwanted sibilance in consonants such as “S” and “T”.
SINGERS: For singers, the mic is usually placed slightly above the mouth. The distance will really depend upon the vocal style of the singer and the desired recording. A more intimate song may require the vocalist to be closer to the mic for a breathy and warm sound. An operatic singer may need some space from the mic in order to sing fully and dramatically. Be aware of a singer’s mic technique before pressing the record button. If the talent is inexperienced, they may not know how to move away from the mic during louder vocal performances. If the vocalist is causing the meters to unpredictably hit red, I will often use a limiter during recording. - SEE FIGURE 8.11
Understanding proper mic choice and placement is of the utmost importance for recording. The right mic, placed wrong, will not achieve the desired sound. I remember my first mentor, Len Silberg of Producers Two, teaching me how to painstakingly place a mic in front of a vocalist. The difference between a few inches and a slight angle can make or break a recording. Miking techniques vary widely, and this text is not meant to be an exhaustive study on the subject. The examples shown in this book are generally seen as some of the basic standards adapted in many studios.
FIVE BASIC STEPS FOR A GREAT RECORDING:
- INSTRUMENT: Know how the instrument produces sound in order to gain an understanding of the sonic possibilities during the recording process.
- MIC: Microphone choices should be considered based on the tonality and characteristics of the instrument. Dynamic, condenser, and ribbon microphones are all studied for the various recording outcomes. In some cases, such as piano, multiple microphones will need to be considered for stereo tracking.
- PATTERN: Polar patterns are chosen for each individual microphone. These patterns include omni, cardioid, and figure eight, with many variations to consider.
- PLACEMENT: Microphones are placed with extreme consideration given to the process that the individual instrument uses to produce sound. Experimentation is encouraged! It is incredibly important to develop a critical listening pattern to discern proper mic placement - trust your ears...
- LEVELS: At this final stage, the overall recording levels must be set accurately. If the gain is set too high, the recording will overload the channel causing digital feedback. If the gain is set too low, the ambient room sound will become overly apparent, causing unwanted extra noise on the track. Level adjustment always begins with the mic preamp, then the digital audio converter, ending with the channel meters in the digital audio workstation - follow the signal's path! If there is red on the meter anywhere along the signal path, you will have distortion on the track.
VOCALS:
There are basically two types of vocal recordings; sung and spoken. They each utilize different mic techniques in order to capture the performance. In the studio, a large diaphragm condenser mic set to a cardioid polar pattern is commonly used for voice. Axis describes the angle of the mic as it is pointed at the person or object to be recorded. I will rarely point a microphone directly at the mouth of the vocalist. There are times when a slight angle is advantageous to avoid plosives (pops) such as in the letter “P”, and unwanted sibilance in consonants such as “S” and “T”.
SINGERS: For singers, the mic is usually placed slightly above the mouth. The distance will really depend upon the vocal style of the singer and the desired recording. A more intimate song may require the vocalist to be closer to the mic for a breathy and warm sound. An operatic singer may need some space from the mic in order to sing fully and dramatically. Be aware of a singer’s mic technique before pressing the record button. If the talent is inexperienced, they may not know how to move away from the mic during louder vocal performances. If the vocalist is causing the meters to unpredictably hit red, I will often use a limiter during recording. - SEE FIGURE 8.11
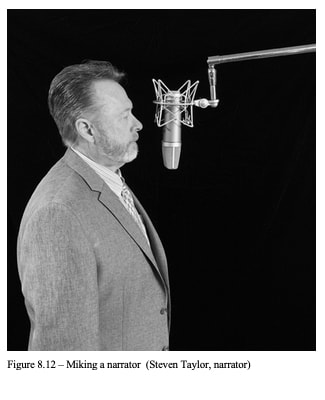
NARRATORS: When miking a narrator, it is best to set the mic directly in front of the mouth, slightly off axis (at an angle). I always test to see how the speaker’s plosives are produced. Some people have “pops” that aim to the left and some to the right. For a natural sound, I try to avoid using a pop filter. Pop filters are round frames covered with a thin netting that helps to capture unwanted plosives and sibilance. The large filters can color the sound and often tend to get in the speaker’s line of sight if they are reading from a script. - SEE FIGURE 8.12
ELECTRIC GUITAR:
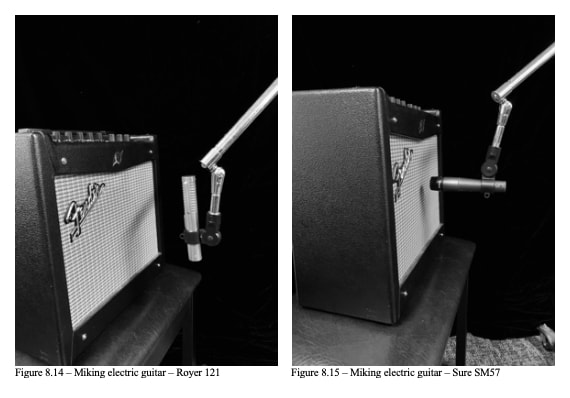
A good place to start, when talking about miking electric guitars, is that we are not actually miking the guitar, we are miking the amplifier. A good guitar amp is crucial to a good electric guitar sound, but a great player can overcome a bad amp. The amp speaker is an extension of the guitarist, and pros know how to use their amps in the most musical way possible. I always raise the guitar amp off the floor to avoid floor reflections. It is important to find the sweet spot in front of the speaker. Every amp model is different, and one technique will not always work on every amp. Move the mic around in front of the amp until you find the perfect sound. Most modern engineers use one of the two methods pictured in figures 8.14 and 8.15.
A good place to start, when talking about miking electric guitars, is that we are not actually miking the guitar, we are miking the amplifier. A good guitar amp is crucial to a good electric guitar sound, but a great player can overcome a bad amp. The amp speaker is an extension of the guitarist, and pros know how to use their amps in the most musical way possible. I always raise the guitar amp off the floor to avoid floor reflections. It is important to find the sweet spot in front of the speaker. Every amp model is different, and one technique will not always work on every amp. Move the mic around in front of the amp until you find the perfect sound. Most modern engineers use one of the two methods pictured in figures 8.14 and 8.15.
METHOD 1: The Royer 121 ribbon creates a very present and warm recording. For a bright sound, place the mic 6 to 8 inches from the grill with the ribbon element centered on the speaker. The sound will become warmer as you move the mic away from the center of the speaker. - SEE FIGURE 8.14
METHOD 2: The Sure SM57 has been a staple in studios for decades and offers a bright and open sound. The mic can be placed anywhere from 1 inch to a foot from the speaker. This method has been popular since the 1950s. - SEE FIGURE 8.15
It might be good to note that the Royer will cost more than ten times the price of a simple SM57. I have been recording with the 121 for over a decade, and I love the way the guitar sits in the mix.
ACOUSTIC GUITAR:
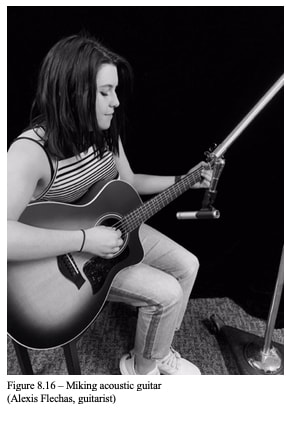
Every acoustic guitar is different, and there is no single best way to record them, but there are some general approaches. A great place to start is by placing a small diaphragm condenser mic around 8 to 10 inches away, directed at the point where the fretboard connects with the body of the instrument. Placing the mic too close will cause a “boomy” low end proximity effect. It is not advisable to point the mic directly at the sound hole. The instrument sounds better closer to the fretboard. Recording a nylon string guitar is very similar, but I would consider putting a rug under the player to offset possible reflections emanating from the floor. As with any miking technique, listen to the instrument for the best placement, and trust your ears. - SEE FIGURE 8.16
Every acoustic guitar is different, and there is no single best way to record them, but there are some general approaches. A great place to start is by placing a small diaphragm condenser mic around 8 to 10 inches away, directed at the point where the fretboard connects with the body of the instrument. Placing the mic too close will cause a “boomy” low end proximity effect. It is not advisable to point the mic directly at the sound hole. The instrument sounds better closer to the fretboard. Recording a nylon string guitar is very similar, but I would consider putting a rug under the player to offset possible reflections emanating from the floor. As with any miking technique, listen to the instrument for the best placement, and trust your ears. - SEE FIGURE 8.16
GRAND PIANO:
The grand piano is considered to be one of the most complicated and difficult instruments to record. This is due to the many overtones created by the complex arrangement of strings, not to mention a piano lid that adds to the overall difficulty of mic placement and reflections. Capturing a beautiful sounding recording can be challenging and demanding, but most composers and engineers will need to record these magnificent instruments fairly often. One of the best methods I have found is shown in figure 8.17. This is a good place to start, but every piano is different, and experimentation will always be necessary to achieve a great sounding recording. - SEE FIGURE 8.17
For stereo close miking, it is best to consider the three-to-one rule; the mics are placed three-times wider than they are close to the piano. A spaced pair is focused over the high and low strings, right above the hammers. If you desire a softer sound, move the mics away from the hammers. I use two small diaphragm condenser mics set to an omni polar pattern. This technique will prevent phasing issues if the recording is meant for radio broadcast where stereo is often mixed back to mono. To augment the bass, place a large diaphragm condenser set to omni, over or around the sound holes along the curved edge of the piano harp. If you are recording in a concert hall, also consider placing a stereo pair approximately 7 feet away focused on the curved edge of the piano. This extra set of mics can be used to capture some of the ambiance in the hall as the piano is played.
For an upright piano, start by taking the lower panel off and placing an omni mic a foot above the pedals, around 12 inches away. The pianist will need to be careful not to bump the mic during the recording, but this method yields a very well-rounded sound from the upright.

THE STRINGS:
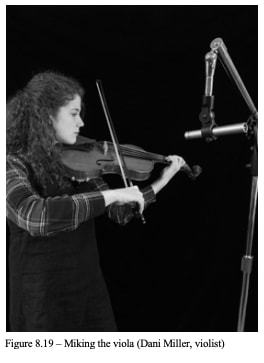
As with many instruments, the strings sound better when they are not miked too close. The sound needs room ambiance to develop before it is heard in its most sonorous form. When we stand directly in front of a stringed instrument, the sound can be scratchy and even harsh. The bow hairs are rubbed with rosin to help create friction as the player bows across the strings. As we move farther away from the instrument, the tone begins to warm up and lose some of the harsher edge caused by the bowing.
VIOLIN / VIOLA: The violin and the viola are very similar in size and shape. The viola is slightly larger and has a deeper tone than the violin, but the two instruments can be miked in largely the same way.
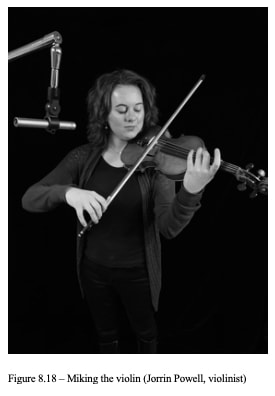
Start with a small diaphragm condenser placed 1 to 3 feet away, aimed slightly above where the bow touches the strings. A good rule of thumb is to place the mic where you think it should be, and then move it back a few more inches. If the sound is too scratchy or harsh, move the mic further away and slightly of axis as needed. Trust your ears when placing the mic to find the individual voice of the instrument. The same techniques also apply for fiddle. Keep in mind that the only difference between a fiddle and a violin is the type of music being played. They are literally the same instrument.
Do not be afraid to add some reverb during the mixing process. The reverb will help with intonation issues and soften the edge of the instrument.
Do not be afraid to add some reverb during the mixing process. The reverb will help with intonation issues and soften the edge of the instrument.
CELLO: The cello emits a wonderfully deep and resonant tone that is easier to mic than the smaller violin and viola. A large diaphragm condenser placed about 2 feet away is a great place to start. Aim the mic slightly below the bridge. If bowing noise becomes a problem, move the mic back a little. The microphone pictured in figure 8.20 is an AKG 414.

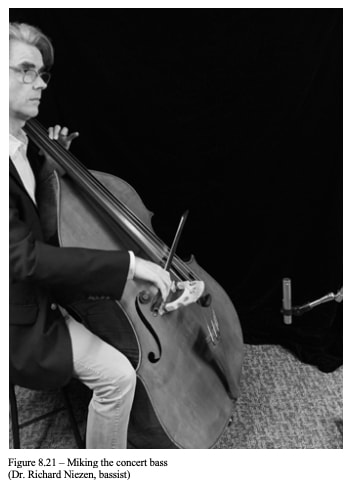
CONCERT BASS: The traditional concert base used in classical music and the upright bass used in jazz are the same instrument. The only difference is the reperetoir and the playing technique. My favorite recording method is to place a ribbon mic (Fig. 8.21) about 14 inches away from the bass, aimed just below the bridge. A large-diaphragm condenser also works really well in this position.
THE BRASS:
There are many considerations that must be taken into account when recording brass instruments. I would encourage experimentation regarding the distance from the instrument and the type of mic used for each recording. For example, I have found that a ribbon mic works incredibly well for recording the trumpet, but for flugelhorn, a large diaphragm mic placed a few feet away seems to work better than a ribbon. Always trust your ears.
TRUMPET: When recording the trumpet, as with all brass instruments, there is a certain amount of unwanted noise that results from clinky valves, movement of air in pipes, and lots of spit.
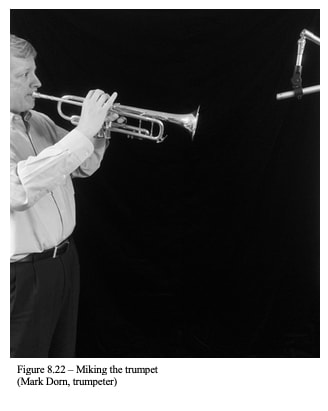
Close miking is never a good idea. Start with the mic placed 1 to 2 feet from the bell. Position the mic slightly higher so that the air is not focused directly at the mic, and point the mic down toward the bell. The closer the mic is to the bell, the more you will hear the valves, and at times, the spit in the instrument. The sound will become cleaner and much more focused as you move away from the instrument. These basic recording principles are the same for French horn, trombone and flugelhorn.
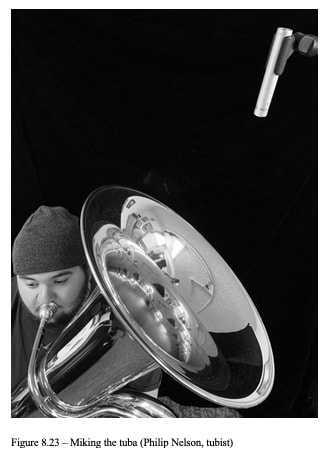
TUBA: I hope that everyone reading this book has the opportunity to record the tuba. These massive instruments are simply fun to be around! Avoid pointing the mic directly into the bell for the same reasons mentioned previously when recording trumpet. Stay a few feet away and angle the mic toward the bell, slightly offset (Fig. 8.23). A small diaphragm condenser or a ribbon mic works great for recording the tuba.
TUBA: I hope that everyone reading this book has the opportunity to record the tuba. These massive instruments are simply fun to be around! Avoid pointing the mic directly into the bell for the same reasons mentioned previously when recording trumpet. Stay a few feet away and angle the mic toward the bell, slightly offset (Fig. 8.23). A small diaphragm condenser or a ribbon mic works great for recording the tuba.
THE WOODWINDS:
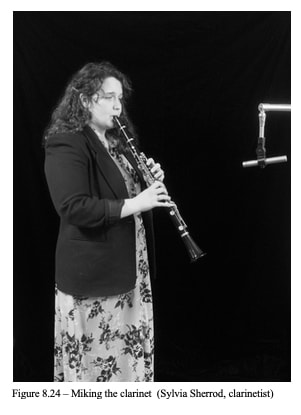
When recording woodwinds, it should be noted that they each have certain characteristics that offer many recording variations. For instance, the clarinet can be made from plastic, hard rubber, wood, metal, and even ivory. They all have many keys that can cause clicks during recording. Here are a few general guidelines:
FLUTE: A jazz flute can be miked closer to the mouthpiece, but a classical flute should be miked about a foot above and 2 to 3 feet away.
CLARINET: The clarinet is very hard to close-mic, but it can be recorded effectively with an omni mic positioned approximately 2 feet away from the instrument (Fig. 8.24).
OBOE & BASSOON: Oboe and bassoon are recorded in a similar manner to the clarinet, about a third of the way up on the body of the instrument.
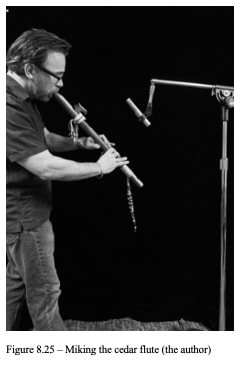
CEDAR FLUTE: I often use world winds, such as the cedar flute in my film scores. The cedar flute has a very gentle and somewhat airy texture. The sound of keys rattling during a performance is not an issue. A ribbon mic positioned around the upper sound holes, at a distance of 8 to 12 inches is a good starting point. The ribbon warms up the sound, but a large diaphragm condenser is also a great option.
CEDAR FLUTE: I often use world winds, such as the cedar flute in my film scores. The cedar flute has a very gentle and somewhat airy texture. The sound of keys rattling during a performance is not an issue. A ribbon mic positioned around the upper sound holes, at a distance of 8 to 12 inches is a good starting point. The ribbon warms up the sound, but a large diaphragm condenser is also a great option.
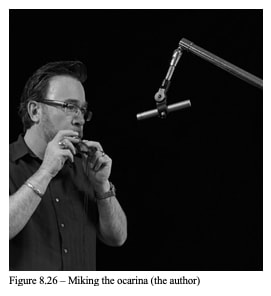
OCARINA: The ocarina is a haunting instrument with a bright and open tone. Use a small or large diaphragm condenser set to a cardioid pattern about 8 inches from the instrument. Adding a little reverb to the final mix will give the instrument a smooth and dream-like character.
PERCUSSION:
When recording percussion as part of an orchestral ensemble, I commonly ask the percussion section to play at one degree lower than the written dynamics in the score. With dozens of sensitive microphones on the stage, it is easy for the percussion instruments to overwhelm the room and bleed into the surrounding mics, making it difficult to mix the orchestra.
As a rule, I never record instruments such as the mark tree and triangle during a session. The high-pitched ringing is nearly impossible to isolate during the recording. I record these as an over dub after the session, or at my studio prior to mixing.
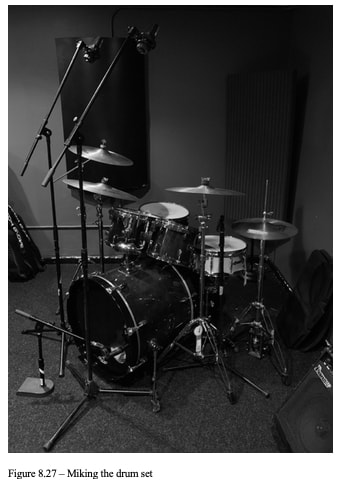
DRUM SET: In this example (Fig. 8.27), the drum set is being recorded with a four-mic set-up. The two overheads are AKG 414s for picking up the cymbals, tom toms, and adding a stereo pair for the mix. A Sure SM57 is placed slightly inside the kick drum, and another SM57 has been focused on the snare drum. Having separate snare and kick mics is incredibly helpful in the mix. The kick drives the beat of the music, and good isolation allows for proper EQ. Miking the snare brings flexibility for effects such as delay and reverb to the final mix. Note: Be careful to place the snare mic out of the way so that the drummer does not hit it.
When recording percussion as part of an orchestral ensemble, I commonly ask the percussion section to play at one degree lower than the written dynamics in the score. With dozens of sensitive microphones on the stage, it is easy for the percussion instruments to overwhelm the room and bleed into the surrounding mics, making it difficult to mix the orchestra.
As a rule, I never record instruments such as the mark tree and triangle during a session. The high-pitched ringing is nearly impossible to isolate during the recording. I record these as an over dub after the session, or at my studio prior to mixing.
DRUM SET: In this example (Fig. 8.27), the drum set is being recorded with a four-mic set-up. The two overheads are AKG 414s for picking up the cymbals, tom toms, and adding a stereo pair for the mix. A Sure SM57 is placed slightly inside the kick drum, and another SM57 has been focused on the snare drum. Having separate snare and kick mics is incredibly helpful in the mix. The kick drives the beat of the music, and good isolation allows for proper EQ. Miking the snare brings flexibility for effects such as delay and reverb to the final mix. Note: Be careful to place the snare mic out of the way so that the drummer does not hit it.
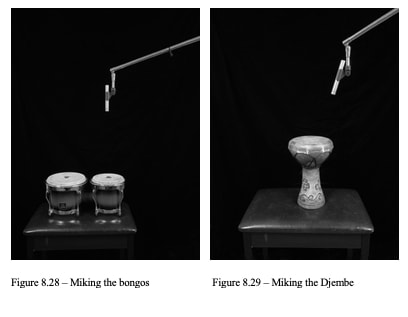
BONGOS / DJEMBE: To mic the bongos, point a small diaphragm condenser mic about 16 inches away, facing slightly toward the smaller drum. For close miking the djembe, place the mic about 6 to 8 inches above the outer edge of the instrument. A room mic also works well for the djembe.
ORCHESTRA:
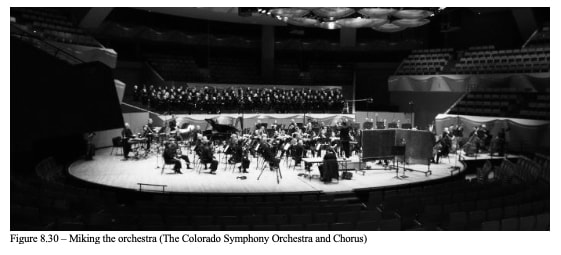
There are many varied techniques to record an orchestra that cannot possibly be fully described in this chapter. My basic approach is two-fold; close miking and room mics. Because most of the music that I record with an orchestra is for a film or television program, I strongly lean toward close mics for every section and spot mics for all of the solo instruments. I utilize close miking because I need extensive control over the individual sections and solos during mix down. I also mix to multiple stems (covered later in this chapter) so that the post-production house will have more flexibility in the final mix to film. All of my scoring stages will typically include a few stereo mics placed over the conductor and toward the middle of the hall to add ambiance. During the recording of my 1st Symphony, we had nearly thirty Neumann mics strategically placed on the orchestra and the choir.
There are many varied techniques to record an orchestra that cannot possibly be fully described in this chapter. My basic approach is two-fold; close miking and room mics. Because most of the music that I record with an orchestra is for a film or television program, I strongly lean toward close mics for every section and spot mics for all of the solo instruments. I utilize close miking because I need extensive control over the individual sections and solos during mix down. I also mix to multiple stems (covered later in this chapter) so that the post-production house will have more flexibility in the final mix to film. All of my scoring stages will typically include a few stereo mics placed over the conductor and toward the middle of the hall to add ambiance. During the recording of my 1st Symphony, we had nearly thirty Neumann mics strategically placed on the orchestra and the choir.
CHOIR:
One technique that I have found to be very effective for recording choirs is to use four mics, placing a condenser mic approximately 8 to 10 feet away from each section. This gives the mixing engineer optimal control during the mix down. For a greater blend, move the mics back a little. Adding an additional set of stereo mics 3 to 4 feet directly above the conductor can be helpful to open up the stereo field and add room ambiance to the mix.
BRASS ENSEMBLE:
Brass players are usually great at blending naturally with each other, and spot miking is not always necessary. To record a full brass section, place a spaced stereo pair 10 to 12 feet from the ensemble. If stereo is not needed, consider having the players sit in a circle with single condenser set to an omni pattern in the middle of the group. A large diaphragm such as the Neumann 67 sounds great with brass.
EDIT & MIX:
CLEANING TRACKS: Before I begin mixing, I spend time cleaning the tracks. When a microphone is left on throughout tracking, it will record the room noise and the other instruments during the moments when the miked instrument is not playing. For a small ensemble, this is not generally a problem, but for an entire orchestra with over thirty mics on the stage, it soon becomes an issue. Using gates to mute the static sound can resolve the issue, but gates can be tricky, and if the threshold is set too aggressive, they can sound unnatural. A gate is a device used to automatically mute audio signals when the source is not playing. If a gate is used on a vocalist, be sure that the initial and trailing consonants are not cut off. This is especially important for instruments with a light attack such as oboe and woodwinds. I prefer to write in fades when the instrument is not playing. A gentle fade sounds much more natural than a gate, but it is also an immense amount of work. I use this method when mixing my orchestras. I clean the tracks for every single instrument.
DYNAMICS: Using a dynamics processor to even out the volume can be a very helpful while mixing. I will often utilize a processor to thicken out a weak instrument or a vocal that needs to stand out in the mix. I try to avoid overusing compression in my orchestral recordings. Compression is a wonderful tool to even out a track, or on the master bus (the main stereo mix track) to lift a song for radio, but overuse is often frowned upon in the classical world.
PANNING: The pan control setting allows the engineer to send a single track to the left, right, or somewhere in between, during a mix. Panning puts the individual instruments in their proper perspective for the listener. When I mix the orchestra, I pan the instruments as they would normally be heard on the concert hall stage. The violins to the left, cellos to the right, woodwinds in the center, etc.

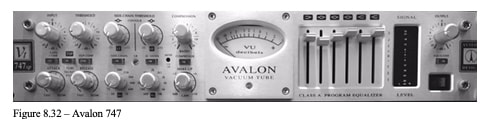
MASTER BUS: In the ever-evolving world of digital recording, it is always a good idea to include something in the signal flow to help bring warmth to the sound. I use an Avalon 747 on my master mix bus to add EQ, light compression, and to take some of the edge off my digital instruments.
STUDIO MONITORS: Studio monitors are the ears of the studio. A proper reference monitor will allow the engineer to hear a flat and even version of the audio. Commercial speakers used for stereo systems bias the sound with pronounced frequencies such as bass and treble. When an engineer mixes on speakers that accentuate a certain frequency, they will compensate accordingly, and the result will be a mix that does not sound correct when played back on other sound systems. Flat studio monitors offer a true and honest version of the recording. The same is true for headphones and ear buds. Most studios will use multiple speakers as a reference during the mixdown. I also utilize very flat studio headphones, earbuds, and small monitors when I mix an album or a film. The goal is to create a mix that translates well to many different sources, such as car speakers, television speakers, laptops and smart phones.
MIXING: When a mix is focused toward the commercial music market, the format is usually going to be stereo. For film and television, the composer is typically sending the music to a post house where the score will be added to the film’s soundscape with narration, dialogue and sound effects. It is common for the postproduction engineer (the person mixing the film) to ask the composer for stems. Stems are basically sub mixes of the music. For example, I send a separate mix within each section of the orchestra, such as woodwinds, brass, percussion, and strings. I will also send some of the solo instruments as separate stems. The stems allow the engineer to mix the music into the existing soundscape and assign the various sections for surround sound.
MIXING: When a mix is focused toward the commercial music market, the format is usually going to be stereo. For film and television, the composer is typically sending the music to a post house where the score will be added to the film’s soundscape with narration, dialogue and sound effects. It is common for the postproduction engineer (the person mixing the film) to ask the composer for stems. Stems are basically sub mixes of the music. For example, I send a separate mix within each section of the orchestra, such as woodwinds, brass, percussion, and strings. I will also send some of the solo instruments as separate stems. The stems allow the engineer to mix the music into the existing soundscape and assign the various sections for surround sound.
MASTERING: Mastering is the final stage in audio post-production. When a mix is completed in a studio, the tracks can be sonically inconsistent, and they often need extra preparation before distribution. The goal in mastering is to create a unified sound that remains consistent throughout the album. This can include normalizing the overall sonic levels, and even adding EQ and compression to prepare the tracks for radio and airplay.
CHAPTER TAKE AWAYS:
STUDIO NOTES
Tip #1: Always buy the maximum microphone you can afford. Junk in junk out. It’s better to have one great mic than many sub-par mics.
Tip #2: A microphone is only as good as its pre-amp.
Tip #3: Similar to composing music, let your mix ripen a little. Don’t be over-zealous to send your mix off to the producer the moment you’ve printed. Let it sit a day. As always, music sounds different with fresh ears.
- What studio elements are important to you?
- What are the three polar patterns?
- What are the three types of microphones?
- Why is it a bad idea to mix using your dad’s old stereo speakers?
STUDIO NOTES
Tip #1: Always buy the maximum microphone you can afford. Junk in junk out. It’s better to have one great mic than many sub-par mics.
Tip #2: A microphone is only as good as its pre-amp.
Tip #3: Similar to composing music, let your mix ripen a little. Don’t be over-zealous to send your mix off to the producer the moment you’ve printed. Let it sit a day. As always, music sounds different with fresh ears.
References
Huber, David Miles. (1981). The MIDI Manual. Carmel, IN: SAMS
Karlin, Fred. (2004). On The Track. New York, NY: Routledge.
Kennan, K., & Grantham, D. (2002). The technique of orchestration (6th ed.). Upper Saddle River, NJ: Prentice Hall.
MIDI Association. (2020). MIDI Is Born. Text. https://www.midi.org/articles-old/midi-history-chapter-6-midi-is-born-1980-1983
Thoreau, Henry. (1854). Walden or Life In The Woods. Ticknor & Fields. Boston, MA: Easton Press.